Vermicomposting: Composting with Worms
Worm composting, or vermicomposting, is the use of worms to turn food scraps into "castings." Worm castings (worm poop) are an excellent soil amendment for house plants and gardens.
Worm composting can be done indoors, year-round. Vermicomposting is a good complement to an outdoor compost pile or food scrap drop-off to keep food waste out of the trash.
To compost with worms, you need these materials:
Use the right worms

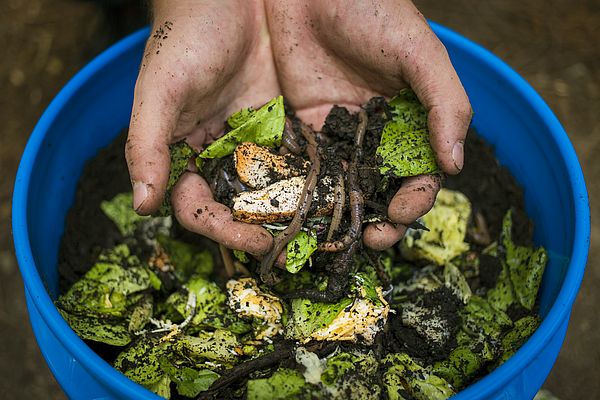
Red wiggler worms (scientific name Eisenia fetida) are the preferred species for vermicomposting. They do well in environments with lots of organic matter at temperatures between 55 and 75 degrees Fahrenheit. Red wigglers will not usually survive below 32 or above 85 degrees Fahrenheit, so keep your worm bin indoors. Common garden worms will not survive in a worm bin.
Ask around (try Front Porch Forum) to see if there are local vermicomposters who would be willing to share worms with you. Red wiggler worms can also be purchased at some bait shops, or from suppliers such as Gardener's Supply Company (VT), Meme's Worms (GA), or Planet Natural. When purchasing worms, ensure that the species you are purchasing is Eisenia fetida.
Worm bins
Ready-made worm bins are available for purchase, such as the Worm Factory, the VermiHut, or the Worm Farm Composter. You can also make your own worm bin out of one or more plastic tubs or buckets. There are lots of examples of do-it-yourself worm bins available online. Get creative with the materials you have on hand!
Make sure your bin has ventilation and drainage to prevent buildup of liquid. The worm bin should also be opaque, because worms do not like to be exposed to light.
Feeding the worms
Feed worms about once a week, and wait to add more food until they have finished their last meal. A red wiggler can eat up to its own weight in food scraps every day. Pay attention to how much your worms eat, and adjust the amount you feed them accordingly.
Bury fresh food scraps in the bedding that is already in the bin, or add the food scraps on top and cover them with fresh, moist bedding (see below). Add food to only one section of the bin (or level of a multi-level bin) at a time. The worms will migrate towards the food source and leave their castings behind.
Menu
Feed your worms mostly scraps from fruit and vegetables. Chopping scraps into smaller pieces or freezing and thawing the scraps before feeding to the worms can help speed up decompostion and reduce potential for odors.
You can also add coffee grounds and filters, paper tea bags and tea leaves, plain pasta and rice, and crushed egg shells in modest amounts. Breads and pineapple can be added in minimal amounts.
Do not feed worms scraps from meat or dairy products, onions, garlic, leeks, citrus rinds, hot peppers, oils, butter, vinegar, spicy or pickled foods, or more than small amounts of pineapple. You may also want to avoid feeding worms broccoli or other cruciferous vegetables if you notice a strong odor.
Bedding
After adding food scraps, cover with a layer of fresh, moist bedding. Bedding is the necessary substrate for the worms to move through, and it also adds to their diet. Bedding can be shredded newspaper, cardboard, dry leaves, paper egg cartons, or chemical-free paper towels. Bedding should be in one-inch pieces or thin strips to prevent compaction. Moisten bedding by misting or sprinkling with water; squeeze out excess water so the moisture level is about that of a wrung-out sponge. Moisture is critical for the survival of the worms, but too much moisture will prevent them from getting the oxygen they need. You can also add a small amount of soil to provide additional microorganisms and grit for the worms to digest.
Harvesting the castings
There are a few different ways to harvest worm castings:
- Add food to only one section of the bin (or one level of a multi-level bin) at a time. The worms will migrate towards the food source and leave their castings behind.
- Shine a bright light on a pile of castings. The worms will move away from the light toward the center of the pile. Remove the outer layer of material, repeating as necessary until you have harvested all you can without also collecting worms.
- Or, simply pick out the worms by hand.
After harvesting, return the worms to the bin with any remaining material, fresh bedding, and fresh food scraps.
Using the castings
Worm castings are rich in organic matter and biological activity. These qualities improve the structure, fertility, and water-holding capacity of soil. Use the castings just like you would other compost: mix into potting soil, spread on top of the soil in your garden or house plants, put some at the bottom of a hole before transplanting, or make compost tea to water plants.
Troubleshooting
Many common vermicomposting challenges have simple solutions. Read more about troubleshooting vermicompost bins.
Sources
“Chapter 14: Vermicomposting, Worm Composting.” The Vermont Master Composter Resource Manual, State of Vermont Agency of Natural Resources, 2017, pp. 33–36.
“Composting with Worms.” CSWD, Chittenden Solid Waste District, 10 July 2019, cswd.net/composting/composting-with-worms/.
NYC Master Composter Manual. NYC Compost Project, 2015.